In Angular, components can share data or trigger each other via communication, regardless of being related or not. There are various types of communication in which the components engage. As your project grows, separate components for different features will be the way to go. In this article, we will delve into some of the ways components communicate with each other in Angular.
Basic Component
A basic component in Angular is when you have a stateless component, without extensions, services, or advanced features.
An example of a basic component:
// profile-photo.ts
import { Component } from '@angular/core';

@Component({
  selector: 'app-profile-photo',
  template: `<img src="profile-photo.jpg" alt="Your profile photo">`,
  styles: `img { border-radius: 50%; }`,
})
export class ProfilePhoto { }
or, alternatively
// profile-photo.ts
import { Component } from '@angular/core';

@Component({
  selector: 'app-profile-photo',
  templateUrl: './profile-photo.html',
  styleUrl: './profile-photo.css',
})
export class ProfilePhoto { }
// profile-photo.html
<img src="profile-photo.jpg" alt="Your profile photo">// profile-photo.css
img { border-radius: 50%; }Example source: https://angular.dev/guide/components
Note: All of the examples shown in this article are from the latest version of Angular
Extending the program
In order to use a component in another one, or to use a pipe, directive, or a module, they must be imported via the imports array inside the decorator.
Let’s take an example that imports the ProfilePhoto component from the previous example, and the built-in DatePipe that transforms string dates into Date format.
// user-profile.component.ts
import { Component } from '@angular/core';
import { DatePipe } from '@angular/common';
import { ProfilePhoto } from './profile-photo';

@Component({.
  selector: 'app-user-profile',
  template: `
	<main>
		<app-profile-photo/>
		<p>Joined on: {{ joinedOn() | date }}</p>
	</main>
  `,
  styleUrl: './user-profile.css',
  imports: [ProfilePhoto, DatePipe],
  /* ... */
})
export class UserProfile {
  protected readonly joinedOn = signal<string>('2025-07-15');
}
When imported components are used in the markup, they’re accessed using the selector defined by the component.
Since Angular 14, the components can be defined as standalone and since Angular 19, the components are standalone by default. Given this, the components can be directly imported via the imports array in other standalone components. In the older versions, it was necessary to add standalone:true inside the decorator. Also, the components may have standalone property set to false right away, which means you’d have to import them in a NgModule.
Inheritance
Inheritance is a way of expanding components or directives. When a component extends another component, it inherits the class’ decorated members, such as public and protected properties, inputs, outputs, lifecycle methods etc. It’s a more advanced topic, as for many projects, having components interact with input properties and output events works just fine.
Note: In most cases, you’d want to share logic in a directive or apply a composition pattern rather than use inheritance, which may lead to limitations in the future as the codebase grows.
It’s important to mention that inheritance is not used for communication or state management.
Let’s take an example of a parent component, and a child component extending it:
// parent.component.ts
@Component({ ... })
export abstract class Parent {
  readonly isLoading = signal<boolean>(false);

  protected startLoading() {
	this.isLoading.set(true);
  }

  protected stopLoading() {
	this.isLoading.set(false);
  }
}
// child.component.ts
@Component({
  ...
  template: `
	@if(isLoading()){
	  <div> Loading... </div>
	}
  `
})
export class Child extends Parent implements OnInit {
  ngOnInit() {
	this.startLoading();
	setTimeout(() => {
	  this.stopLoading();
	}, 1000);
  }
}
As seen in the example above, Child has access to all of Parent’s information. As a result, Child acts like both Parent and Child components combined in one, but to use it, only Child’s selector is enough (unless Parent HTML template needs to be explicitly used somewhere else).
Data flow between components
Components can also interact with each other through transferring data and events. This chapter will explain the ways you can pass data between components.
- input() signal and @Input decorator
When components pass data to each other, parent to child communication is done via the input() signal or the @Input() decorator. Note: signal input was introduced with Angular 17, along with other signal features. (Beware: they’re case sensitive!)
Let the app component pass some data down to a component called CustomSlider:
// custom-slider.component.ts
import { Component, input } from '@angular/core';

@Component({
  selector: 'app-custom-slider',
  standalone: true,
  templateUrl: './custom-slider.component.html'
  styles: /*...*/
})
export class CustomSlider {
  readonly value = input.required<number>();
}
 <!-- custom-slider.component.html -->
<div class="slider-container">
    <label>Slider Value: {{ value() }}</label>
    <input type="range" min="0" max="100" [value]="value()">
</div>
 // app.component.ts
import { Component } from '@angular/core';
import { RouterOutlet } from '@angular/router';
import { CustomSlider } from './custom-slider.component';

@Component({
  selector: 'app-root',
  standalone: true,
  imports: [
    RouterOutlet,
    CustomSlider // import the child component
  ],
  templateUrl: './app.component.html'
  styles: /*...*/
})
export class AppComponent {
  // This property holds the value we want to pass down.
  initialSliderValue = 75;
}
 <!-- app.component.html -->
<main>
    <h1>Parent App Component</h1>
    <p>
      We will pass this value to the slider:
      <strong>{{ initialSliderValue }}</strong>
    </p>
    <app-custom-slider [value]="initialSliderValue"></app-custom-slider>
</main>
In the example above, the CustomSlider takes a slider value of type number. In this example, the input signal is used, so in order to access this value from the template, it has to be called like a method (i.e value()). Alternatively, this can be done with the @Input() decorator too. Namely,
@Input({required: true}) value!: number;and then in the template,
<div class="slider-container">
    <label>Slider Value: {{ value }}</label>
    <input type="range" min="0" max="100" [value]="value">
</div>
can be passed right away. Although nowadays signals are preferred over decorators for performance reasons, it’s still worth knowing about the Input/Output decorators.
- output(), @Output() decorator, and EventEmitter
Child to parent communication is done via outputs and events. Child components emit an event to their parents with a value. Let’s take this example:
// vote-button.component.ts
import { Component, output } from '@angular/core';

@Component({
  selector: 'app-vote-button',
  standalone: true,
  templateUrl: './vote-button.component.html'
})
export class VoteButtonComponent {
  readonly voted = output<string>();

  onClick(){
	this.voted.emit('Voted for Angular');
  }
}
 <!-- vote-button.component.html -->
<button (click)="onClick()"> Vote for Angular! </button>
// app.component.ts
import { Component } from '@angular/core';
import { VoteButtonComponent } from './vote-button.component';
@Component({
selector: 'app-root',
templateUrl: './app.component.html',
imports: [VoteButtonComponent],
})
export class AppComponent {
voteStatus: string = 'No one has voted yet.';
handleVote(eventPayload: string) {
this.voteStatus = eventPayload;
}
}
 <!-- app.component.html -->
<h1>Parent Component</h1>
    <p>{{ voteStatus }}</p>
<app-vote-button (voted)="handleVote($event)"></app-vote-button>
In the above example, the button inside the child component, VoteButton, is clicked. Via the output, the information that something has happened is sent to the parent component. The output acts as the broadcaster for the parent to listen to via passing $event. In the template, the parent calls handleVote in the event of the child, which takes a string value that is then emitted by the child to the parent. So, $event listens to this value and takes it.
Alternatively, using @Output decorator, this example would look like as follows:
@Output() voted = new EventEmitter<string>();with the rest of the code staying the same.
However, @Output is a decorator that simply marks a property and doesn’t come with the event-emitting mechanism. The only way to truly use it as an event emitter, is to create an instance of the EventEmitter class which contains the event-emitting mechanism. With the output(), there is no need for it, as it’s a factory function built for that purpose.
Data binding
In Angular, binding creates a dynamic connection between a component logic and its template. The main purpose of binding is for the template to be automatically updated upon changes in the component. You can bind data in one-way or two-way. One-way means the changes in the data only affect the UI, and two-way means that the underlying data changes as well as the UI.
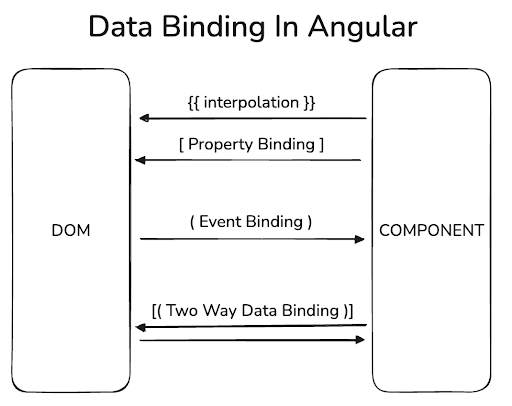
The diagram above summarizes the directions of data binding.
- Interpolation
This is a feature that fetches the dynamic data directly from the component logic and reflects it to the UI:
<label>Slider Value: {{ value }}</label>- Two-way binding
This is a feature that keeps a property in a component’s class and a value in its template in sync.
Syntax:
[(ngModel)]="prop"The syntax of two-way binding combines the property binding […] and event binding (…), and usually uses the ngModel directive provided by the FormsModule package. The example above can be broken down into two steps:
// Property binding
[ngModel]="prop"
// Event binding
(ngModelChange)="prop = $event"
During property binding, the value of the input element is set to the prop’s value inside the component. During event binding, when the value of the input element is changed, an ngModelChange event is emitted. With $event, Angular fetches this value and updates prop in your component with it.
With the introduction of signals, a more modern version of this method was introduced: the model() signal.
import { Component, model } from '@angular/core';

@Component(...)
export class AppComponent {
  prop = model('World');
}
model() creates a two-way bindable signal. In contrast to the traditional method, model() signal creates a signal property especially for two-way binding, which you can update its value directly. With Angular 21 and transition to zoneless change detection, usage of signal based tools brings more advantages, as they change only what has changed, without relying on zone.js.
Content projection
In Angular, content projection can be used to build reusable and flexible layouts as components. Here are some ways of projecting the content of components:
- ng-content
Let’s say that in your main parent component you implement the logic for a DOM element, and you want to access it right from the parent, while keeping it inside a child’s view. This is where the <ng-content> element comes in handy. Here’s the parent component:
// app.component.ts
@Component({
  selector: 'app-root',
  template: `
    <main>
      <app-header>
        <input #projectedInput type="text" placeholder="Search...">
      </app-header>

      <div class="content">
	...
      </div>
    </main>
  `,
  styles: [`...`],
  imports: [HeaderComponent]
})
export class AppComponent {
    // some logic
}
and here’s the child component:
// header.component.ts
@Component({
  selector: 'app-header',
  template: `
    <header>
      <span>MyApp</span>
      <ng-content></ng-content>
    </header>
  `,
  styles: [`...`]
})
export class HeaderComponent {/*...*/}
The block between app-header elements will be projected inside the child’s template, exactly where <ng-content> is located in the HeaderComponent. If you think about it, components with <ng-content> are just like bagels: they allow you to show things through a hole! 🙂
Component Signal Queries
- viewChild
Other than giving other components signals to perform some methods, there’s also a way of granting a component direct access to other component instances with the ability to call their public methods and use public properties.
viewChild is a signal view query. This method is useful in the cases where interaction via input signals is simply not enough, but the parent needs to command its child to do something. Take this example:
// alert.component.ts
@Component({
  selector: 'app-alert',
  template: `
    @if (visible) {
      <p class="alert">{{ message }}</p>
    }
  `,
  styles: [`.alert { background: #ffc107; padding: 1rem; border-radius: 4px; }`]
})
export class AlertComponent {
  visible = false;
  message = 'This is a default alert!';

  public show(message: string) {
    this.message = message;
    this.visible = true;
    setTimeout(() => this.visible = false, 2000);
  }
}
// app.component.ts
@Component({
  selector: 'app-root',
  template: `
    <div class="container">
      <div class="section">
        <h3>viewChild Example</h3>
        <p>This parent directly controls the alert below.</p>
        <button (click)="showAlert()">Trigger Direct Child Alert</button>
        <app-alert />
      </div>
    </div>
  `,
  styleUrl: "./app.component.css",
  imports: [AlertComponent],
})
export class AppComponent{
  private directAlert = viewChild.required(AlertComponent);

  showAlert() {
    this.directAlert().show('Alert triggered directly from the Parent!');
  }
}
In the example above, AlertComponent is a part of the parent template. But thanks to viewChild, the parent can call AlertComponent’s public methods. With viewChild you can also access DOM elements that are inside the component. For instance you can manipulate an input field:
// app.component.ts
@Component({
  selector: 'app-root',
  template: `
   <section>
    <div class="container">
        <h3>@ViewChild Example (DOM Element)</h3>
        <p>This parent directly accesses the input element below.</p>
        <input #nameInput type="text" placeholder="Your name">
        <button (click)="focusInput()">Focus the Input</button>
    </div>
   </section>
  `,
  styles: [`...`],
  imports: [AlertComponent, CardComponent],
})
export class AppComponent {
  private _nameInputElement = viewChild.required<ElementRef<HTMLInputElement>>('nameInput');

  focusInput() {
    this._nameInputElement().nativeElement.focus();
    this._nameInputElement().nativeElement.value = 'Focused!';
  }
}
For DOM elements, you need to pass the reference element variable defined in the component’s template.
Before the introduction of child query signals in Angular 17.2, developers used decorator based queries. Here’s how decorator based @ViewChild looks like:
@ViewChild('nameInput')
private _nameInputElement!: ElementRef;
and for querying child components:
@ViewChild(AlertComponent)
private _directAlert!: AlertComponent;
Note: decorator based queries had a static option available like this:
@ViewChild('nameInput', {static: true})
inputEl!: ElementRef<HTMLInputElement>
This will grant the component immediate access without waiting for the view to be fully initialized.
In signal based queries there’s no static option, but you don’t need to ask when the element will be ready anymore, as you can just react to it inside effect(). You can find more information about the effect here.
- contentChild
contentChild is a signal-based query that allows a component to access a child component, element, or directive projected into it via content projection. When a component uses <ng-content> to project content from its parent, it can query a specific child element inside that projected block.
Let’s say AppComponent uses CardComponent in its template and inside <app-card> it uses <app-alert>:
// card.component.ts
@Component({
  selector: 'app-card',
  standalone: true,
  template: `
    <div class="card">
      <h4>Card Wrapper</h4>
      <p>This card has a slot where content can be placed:</p>
      <div class="content-slot">
        <!-- Content from a parent will be projected here -->
        <ng-content />
      </div>
      <button (click)="showAlertInside()">Trigger Alert Inside Card</button>
    </div>
  `,
  styles: [`...`]
})
export class CardComponent {
  private projectedAlert = contentChild(AlertComponent);

  showAlertInside() {
    this.projectedAlert()?.show('Alert triggered from INSIDE the Card Wrapper!');
  }
}
// app.component.ts
@Component({
  selector: 'app-root',
  template: `
      <div class="section">
        <h3>contentChild Example</h3>
        <p>This parent places an alert inside the card wrapper.</p>
        <!-- The Card wrapper has an <app-alert> projected into it -->
        <app-card>
          <app-alert />
        </app-card>
      </div>
  `,
  styles: [`...`],
  imports: [AlertComponent, CardComponent],
})
export class AppComponent {/*...*/}
The content that’s between the tag of a child component is projected into the child’s template via ng-content. In this case, the AlertComponent is projected, and CardComponent queries exactly this instance. It’s important to note that the query might be undefined if the component isn’t provided. When it finds the component, it can access its public methods – think of this as checking out a colleague’s work rather than managing your own internal state.
For DOM elements, it works similarly. If you want to manipulate an element from the child component while it is defined in the parent’s template:
// app.component.ts
@Component({
  selector: 'app-root',
  template: `
    <main>
      <app-header>
        <input #projectedInput type="text" placeholder="Search...">
      </app-header>

      <div class="content">
	...
      </div>
    </main>
  `,
  styles: [`...`],
  imports: [HeaderComponent]
})
export class AppComponent {/*...*/}
// header.component.ts
@Component({
  selector: 'app-header',
  template: `
    <header>
      <span>MyApp</span>
      <ng-content />
    </header>
  `,
  styles: [`...`]
})
export class HeaderComponent {
  private projectedInputElement = contentChild<ElementRef<HTMLInputElement>>('projectedInput');
   /* some logic */
}
contentChild will search for the element with the #projectedInput identifier. Since signal-based queries return reactive signal objects, their initial value will be undefined until the content is initialized. Using effect() with these queries is highly efficient, as it automatically reacts when the signal’s value changes.
Historically before Angular 17.2, this was achieved using the @ContentChild decorator. The decorator-based equivalent looks like this:
// for DOM elements
@ContentChild('projectedInput') private _projectedInputElement: ElementRef | undefined;

// for components
@ContentChild(AlertComponent) private _projectedAlert: AlertComponent | undefined;
Summary
Components are the core building blocks of Angular projects. In bigger projects you will have multiple components that may or may not be related, but will depend on each other. This article covered the ways components can interact with each other. You can extend a base component class to add additional features or shared logic. You have also learned how components send data to each other, what two-way binding is, and content projection with built-in ng-content.
The most common direction of data flow is between the parent and the child components, where they receive data with inputs and send events with outputs. You can also access the public elements of child components via viewChild and contentChild.